Friday 30 May 2008

Lemon Roast Chicken

Pin It Now!

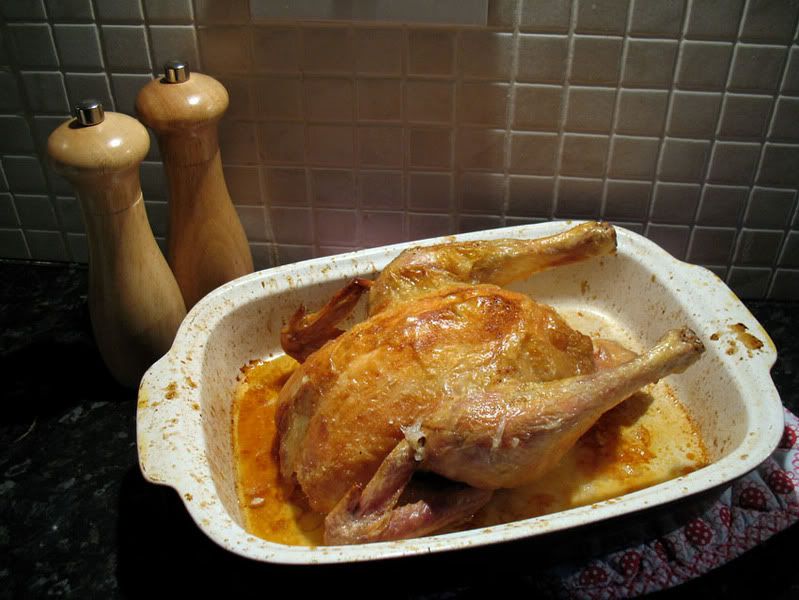
Today I made Nigella’s Lemon Roast Chicken just for myself.

No, I didn’t eat it all, but I bought a wonderful free range chicken last Sunday and it was still sitting in my fridge today, because I was never home in time during the week to roast it and there was no room in the freezer for it. As the date on it said I had to make it today and D. is out for a leaving do from work, I thought I’d just have to treat myself and have it anyways.

Photobucket

I wanted a simple, no faff recipe and I remembered seeing this one in Nigella’s Feast. It is very similar to my own standard roast chicken recipe, apart from that I usually add half an onion and some garlic to the cavity and sprinkle some paprika on the chicken before roasting, but I decided to go with Nigella’s even simpler version as she had never once failed me yet. Oh, and I usually baste my chicken a couple of times, so it won’t dry out, but even with not basting the chicken was good and not dry at all.

So, without further ado, here is and if anybody can tell me how to take a really good picture of a whole roasted chicken, please do, as I think it never looks as good as it smells and tastes.

Photobucket

Lemon Roast Chicken

1 chicken (1 1/2kg), at room temperature
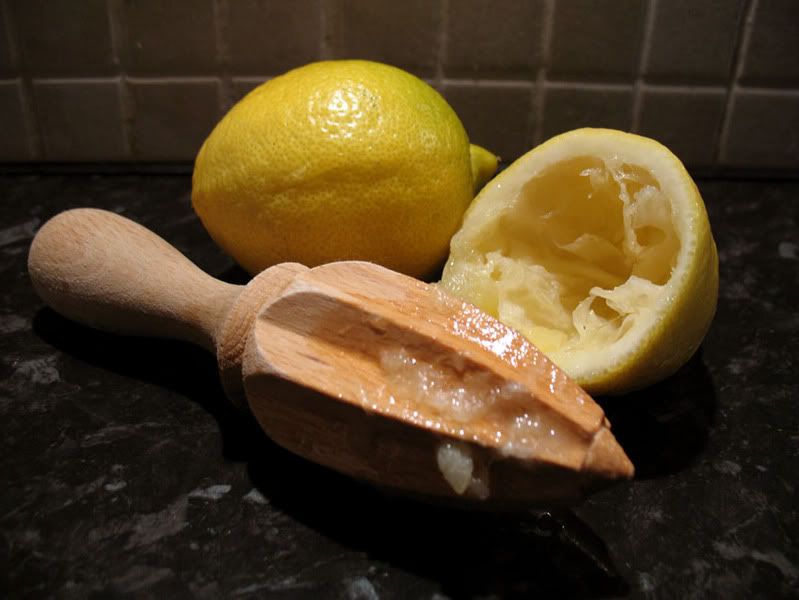
1 lemon
1 tbsp Maldon salt
20-25 gr butter
olive oil

Preheat your oven to 220C/Gas 7.

Wash your chicken inside and out and pat dry with a paper towel.

Place the chicken, breast side up, in a roasting tin and rub the cavity with some of the salt.

Place half of the lemon in the cavity and rub the chicken with the butter and drizzle with a little olive oil.

Place in the middle of your oven and roast for 1 1/4 hours.

Remove from the oven and squeeze the juice of the other lemon half all over. Be careful when you do this as the hot fat at the bottom of the pan will start spluttering.

Sprinkle with the rest of the salt and allow to rest for 15 minutes before carving.

Enjoy!

If you have a bigger or smaller chicken you can calculate the times as given in this recipe.

Monday 26 May 2008

Tofu Fajitas

Pin It Now!

I'm trying to cut down the amount of meat we eat, not just because the price of good quality meat is getting very high, but I guess it's gotta have some health benefits, too.

Tofu is something I am still getting into. I've tried different ways of preparing it, different brands and flavours and I have not always liked the outcome. One way I do like having it is in Tofu Fajitas. I use my Fajita Seasoning Mix and make the fajitas as I would normally do, just replacing the chicken with Beech Smoked Tofu. Quick, healthy and satisfying.

Photobucket

Sunday 25 May 2008

Garlic Bread

Pin It Now!

Well, first of all it seem like many of you want to know about the Guinness Cake. I loved it and so did everyone else. I had to hand the recipe over to a few people and everyone commented on how good it was. It is rich and dense, but at the same time moist and chocolaty without being overly sweet, just perfect for me. The sweet cream cheese frosting goes really well with it, but as I said I only made 2/3 of it and thought that there was plenty of it, I wouldn't want it to be any thicker. It's definitely a keeper, especially as it's so easy to make.

It's been a busy week, so I didn't really get to try a load of new things in the kitchen and most evenings we had old quick favourites. On Friday I took some of my Pasta Sauce with Sausage and Peppers out of the freezer and made some garlic bread to go with it. I often buy it ready made, but I don't know why really because it is so easy and just as quick to make it yourself and it's so much better.

Photobucket

When I went to New York City last December I went to the Penzeys Store, as I had been given some of their spices before and wanted to check it out for myself. I bought some Aleppo Pepper, amongst other things, and D. has started putting it on absolutely everything, he likes it so much, pizza, sandwiches, jacket potatoes... So I added some to the garlic butter mix and it was wonderful. It gave a nice smoky kick to the bread. This isn't so much a recipe, more a guideline and you can add and change as you like, the amounts are estimates.

Oh, and before I forget, congratulations to my mates P. and L. who both ran the Edinburgh Marathon today. I'm proud of you guys and I wish I could have been there!

Garlic Bread

1 part-baked baguette
3tbsp butter, at room temperature
2tbsp chopped fresh basil
1 large clove of garlic
salt, to taste
black pepper, to taste
Aleppo Pepper, to taste (of course you can leave this out or replace it)

Preheat your oven to 200C/Gas 6.

In a bowl mix the butter, basil, garlic, salt, pepper and Aleppo Pepper until well combined.

With a bread knife cut into the baguette as if you want to slice it, but without cutting all the way through.

Spread some of the butter into each gap between the slices.

Photobucket

Wrap in tin foil and bake for 15-20 minutes in the oven.

If you like you can open the foil for the last five minutes so that the baguette can brown easier.

Monday 19 May 2008

Yet Another Cake - Guinness Cake

Pin It Now!

I promise there'll be something else for the next post!

Now, you don't usually find me drinking on my own, in my kitchen, in the middle of the day, but today was different because I was baking Nigella Lawson's Chocolate Guinness Cake from her Feast - Food that Celebrates Life cookbook.

Photobucket

The recipe calls for 250ml (1cup) of Guinness, but unable to buy a single can of the stuff in the supermarket and not wanting to buy a four pack, I bought a bottle of Williams Bros Brewing Co's Midnight Sun instead. Of course there was still half a bottle left, so I couldn't let it go to waste and that's why I was drinking on my own in the middle of the day.

Midnight Sun is described on the bottle as a rich, dark & spicy Porter style beer and there was a mention of chocolate malt and a hint of root ginger, so I guessed it'd make a perfect substitute. The beer on its own was a bit too strong and bitter for me, but than I'm not a serious beer drinker and maybe some of it was down to it being the middle of the day. It did have a nice malty sweetness to it as well though, and I'm sure that if you like Stout you'd really enjoy this!

Well, the cake is for my colleagues birthday tomorrow, so I haven't been able to try it yet, but it was fun and easy to make (I have never before made a cake in a saucepan and of course I got to have a drink in the afternoon.) , the 'dough' tasted great (Yes, I did lick the whisk when I was finished.) and it smells and looks great. I'll let you know what it tastes like next time, as I'll make sure I'll get a slice at work tomorrow. As far as I can tell from the few crumbs that stuck to the springform, it's a great cake though, really dark and chocolaty but not too sweet.

Happy Birthday A.!

Photobucket

Nigella Lawson's Chocolate Guinness Cake

Cake:
250ml Guinness (I used Midnight Sun Porter)
250gr butter, unsalted and cut into slices
75gr cocoa powder
400gr caster sugar
1 x 142ml pot sour cream
2 eggs
1tbsp vanilla essence
275gr plain flour
2 1/2 tsp bicarbonate of soda

Frosting:
300gr cream cheese
150gr icing sugar
125ml double cream

Preheat your oven to 180C/Gas 4.

Butter and line a 23cm springform pan (mine is 25cm and worked fine).

In a large, wide saucepan heat the Guinness and butter, until melted.

Add the sugar and cocoa and whisk until the sugar has melted.

Remove from heat.

Photobucket

Beat together the sour cream, eggs and vanilla essence and pour into the pan, whisk until well combined.

Add the flour and bicarbonate of soda and whisk until smooth.

Pour into the prepared springform pan and bake in the middle of the oven for 45-60 minutes, until a wooden skewer inserted in the middle comes out clean.

Don't remove from the pan until the cake is completely cool.

Once cool the cake can be iced.

For the frosting, whip the cream cheese until smooth, sieve in the confectioners sugar and continue to whip until combined.

Add the double cream and whip again until the frosting is spreadable.

Spread over the top of the cake. I only made 2/3 of the icing and thought it was plenty.

Enjoy!

Sunday 18 May 2008

German Cake II

Pin It Now!

I promised two cake recipes after getting back from my last trip home to visit my family in Germany, and here's the second one. I forgot to write down the recipe when I was at my brother's place, but my lovely niece has e-mailed it to me today (Danke, N.).

This cake couldn't be much more different from the Gooseberry Meringue Cake. It's much less effort, no need to bake to separate layers, stew fruit or whip some cream (even though it's great with cream served on the side, but it's not essential). This is an easy-peasy cake, which is really moist and very tasty. Even if you haven't got any cake pans, you can make this one, just use the tray that came with your oven.

Photobucket

Mandarinenkuchen or Mandarin Tray Cake

375 gr plain flour
275 g sugar
2 tsp baking powder
4tsp vanilla sugar or 1 1/2 tsp vanilla essence
6 eggs
300 gr melted butter
4 x 300gr cans of mandarin segments in juice, drained but keeping the juice from 3 of the cans

Preheat your oven to 180C/Gas 4.

Cream the eggs and sugar, add the butter and mix in the flour, sugar, baking powder and vanilla sugar (essence). Mix until smooth.

Pour onto a large, greased baking tray (the one that came with your oven is perfect in size).

Top with the drained mandarin segments.

Bake for 30 minutes.

Pour the juice that you have kept from three of the cans over the cake straight away while it's still hot, coming from the oven. It will seem like a lot f liquid and you'll think you'll end up with a soggy mess, but just go for it and you'll have a wonderful cake that's still moist after three days, not that it'll last that long.

Finally as my niece put it in her e-mail: Bon appetit!


Friday 16 May 2008

German Cake as promised

Pin It Now!

I had a really nice e-mail from one of my blog readers, Alison, today that made me think that maybe my blog should be called 'A Cup of Coffee and a Slice of Cake', as that would be the German equivalent to 'A Pot of Tea and a Biscuit'. Yes, I know Germans also drink tea and eat biscuits, and elsewhere in the world you can get coffee and cake, but coffee and cake is quite an institution in Germany.

If I may so myself, we Germans do coffee and cake well and when I got back from my last trip I promised I'd share two cake recipes that I picked up. Well, here's the first one, Stachelbeer Baisertorte or Gooseberry Meringue Cake. It's one of my dad's favourite cakes even though him and cream are on a bit of a war path.

Photobucket

My mother has made it for years, it looks great and tastes even better. I didn't use to like it when I was younger as I was convinced that I would suffer terribly if I had to eat gooseberries, but I have wised up (there might hope for me yet, to become a wise old woman maybe) and now love the combination of the sweet meringue and the tart gooseberries. I have also had this cake with sour cherries and with strawberries instead of the gooseberries. I really like the cherry version, but for me the strawberries were not quite enough of a contrast to the meringue and I found it a little sweet. Still pretty good though and as we were tucking into this cake at my nephew's First Communion, my mum and I talked about trying to make it with stewed rhubarb (just briefly stewed so it's still chunky).

Well, and this is also where this recipe becomes a little difficult to 'translate' as in Germany you'll find canned gooseberries in every supermarket, but I have never seen them anywhere here, so I have altered the recipe slightly and include a way of stewing fresh gooseberries in the hope that you can at least find fresh ones where you are later this year. If you use strawberries it's simpler, you just cut them into quarters and layer them with the cream in between the two cake layers, no stewing involved.

Photobucket

Stachelbeer-Baisertorte or Gooseberry Meringue Cake

For the dough:
100gr butter, soft
100gr caster sugar
4 egg yolks
125gr plain flour
1tsp baking powder

For the meringue:
4 egg whites
200gr caster sugar
80gr flaked almonds

For the filling:
600ml single cream
4tsp vanilla sugar
2tsp caster sugar
2 pkts 'Sahnesteif' (this is optional and unavailable here in the UK, it's something that helps the cream stiffen when whisked)
2 tbsp butter
1 lemon, zest and juice only
100ml water or apple juice
75gr caster sugar
300gr gooseberries
1 sheet of gelatin

Preheat your oven to 160C/Gas3.

In a bowl beat the butter and sugar until well combined and 'frothy', using an electric mixer.

In a separate, clean bowl beat the eggs whites and sugar until completely stiff and you are able to turn the bowl upside down without it falling out. Make sure you have cleaned the beaters of your mixer well, otherwise the egg whites won't stiffen.

Line the bottom of a 26cm springform pan with baking paper and pour half of the batter into a the pan. Spread out evenly and top with half of the meringue mixture and sprinkle with half of the almond flakes.

Bake for 25-30 minutes in the middle of the oven, until golden.

Remove from oven and allow to cool for five minutes, before removing from the pan (this is where the baking paper is essential, as you can lift it off) and repeat with the other half. You can of course do this all at once if you own two of the springform pans and have a fan assisted oven.

While the cake layers are cooling whip your cream with the sugar and vanilla sugar until stiff.

When the cake layers are completely cooled, stew your gooseberries.

Melt the butter in a pan and add lemon juice, zest and water and gooseberries.

Bring to a simmer and cook for about five minutes, until the gooseberries soften but don't fall apart.

Remove the gooseberries with a slotted spoon and thicken the juices with gelatin (see packet for instructions) or the quick gel, return the gooseberries, allow to cool a little.

Now place one cooled cake layer on a serving plate, top with the gooseberries and allow to cool completely.

Top with the stiff whipped cream and finally place the other cake layer on top carefully.

Should you have any left over, it freezes quite well.

Enjoy!

There are loads of other versions on the net, that suggest using peaches, raspberries, mixed berries or red currants. As I said I'd always choose a tart fruit over a sweet one to contrast the sweet meringue. Any of those could be used without stewing.

You'll need a really sharp knife to cut it, or alternatively you can pre-slice the top layer and place it on top in 'ready-made' slices, otherwise you have to be careful that the cream doesn't push out to the sides when you cut it.


Foil Baked Salmon and Asparagus

Pin It Now!

Where has the week gone? We had Foil Baked Salmon and Asparagus for dinner last Sunday and I'm only just getting a chance to post it. Is it really Friday again already?

I haven't got that much to say about the recipe. It does all the talking for itself. It's salmon, it's asparagus, it's baked in foil, therefore not only is it simple, it also does taste great and it's healthy. Full of essential Omega 3 from the salmon and iron from the asparagus and no other fat in sight. (Therefore I didn't have to feel so bad when I poured some melted butter over my fresh Jersey Royal Potatoes.)

Try it I'm sure you'll like it. You can increase the amounts easily to serve more people.

Photobucket

Foil Baked Salmon and Asparagus (serves 2)

2 skinless salmon fillets
250gr asparagus, woody ends trimmed off
1/2 lemon
salt, to taste
freshly ground black pepper to taste

Preheat your oven to 220C/Gas 8.

Place the salmon fillet into the middle of a large sheet of tin foil.

Season with salt and pepper and any other seasoning you might like to add.

Place half of the asparagus spears on top, squeeze the juice of 1/4 of a lemon over it.

Bring up the sides of the foil and fold the top over twice, then seal the sides. Make sure the parcel is sealed well but still has plenty of air inside for the steam to circulate. It shouldn't wrap the salmon and asparagus tightly, but be more like a tent around it.

Photobucket

Repeat with the other salmon fillet.

Place the foil parcels on a baking tray and place in the middle of the oven for about 15 minutes.

Be careful when you remove them from the oven and open the parcels as they will be full of hot steam. Drain off the juices and serve immediately.

Enjoy.

Photobucket

Meme time

Pin It Now!

I was tagged by Melissa at It's Melissa's Kitchen for a meme, so here it goes...

Why did you start your blog?
I don't know really. I guess it was because I like reading other people's food blogs, I really love cooking and baking and have enjoyed taking pictures of the results for a while now (I used to post pictures regularly on Recipezaar). So, one day when I was a bit bored I just thought I'd start one to kill some time. Never did I know that it'd become so addictive.

How did you come up with your blog name?
I found that quite difficult as there are already so many good names out there and a couple that I had thought of, already existed or were far too similar and I'm not great at coming up with titles at any rate. I guess I just thought about things I like and that's how it became what it is.

Do your friends and family know about the blog and what do they think?
I think a lot of them know, not everyone, but that's not because I keep it a secret, it's just because I don't usually say: 'Hi, so good to see you. Oh, by the way I have started a blog, go check it out!' I think most of them probably like it, the feedback I have gotten has been positive, very few of them post comments directly on here though.

How do I write a post?
I sit down at my laptop, connect to the internet and start typing. I guess that's not the point of the question though, but with a food blog that's easy. What I write about is determined by what's happening in my kitchen. What I cook or bake is what I write about and sometimes of course it might be something else that I think worthy of sharing, usually somehow connected to food though.

Have you ever had a troll or had to delete unkind comments?
Luckily, I have never had either. I don't know if I would delete any unkind comments either, if it's somebody's opinion, let them have it. It's a public blog after all and not everyone is gonna like it. I guess the only reason for me deleting one would be if it was offensive to others.

Do you check your stats or care how many people read your blog? If you care, how do you increase traffic?
Yes, I do check them. At the beginning I did it all the time, but that has calmed down a bit. I find it fascinating though to see where in the world people come from and obviously I like to see how people come across my blog (which reminds me that I need to update the links to other people's blogs). The things that so far have increased my traffic are joining the UK Food Blogger's Association, the Foodie BlogRoll, somehow being picked up on by www.foodreel.co.uk and of course through my visits and comments on other people's blogs.


If you like this meme, feel yourself tagged!


Monday 12 May 2008

Sunday's Lazy Breakfast

Pin It Now!

I woke up on Sunday morning just to find that D and our friend G had fallen asleep on the sofa in the living room. Well, one of them on the sofa the other one in a chair. I think that maybe just maybe that was due to just one (or two, or three) too many drinks at the BBQ on Saturday night.

When I looked at them, I was so glad that I had been at least a little more sensible and had drunk a few pints of water before going to bed at about four in the morning. They looked rough and I think they felt it too, even though D only admitted to it when I wanted to go out for a picnic in the afternoon and he really wasn't up to it.

Usually on a morning like that I'd probably cook us a Full English, but I wanted something different, so I made some pancakes, chopped up some fruit, got out the syrup, mixed some yoghurt with quark, made some coffee and poured plenty of fresh orange juice, before waking the two.

The breakfast seemed to be much appreciated and went down well with all of us. A great start to what turned out to be a lazy sunny Sunday.

Photobucket

Old Fashioned Pancakes (serves 3-4)

1 1/2 cups plain flour
1 tsp salt
2 tbsp sugar
2 1/2 tsp baking powder
1 medium egg, beaten
1tsp vanilla extract
3 tbsp butter, melted
1 1/4 cups milk

Sift together the flour, salt, sugar and baking powder in a bowl.

In a separate large bowl whisk toghether the beaten egg with vanilla extract, melted butter and milk.

Add the flour mix little by little, whisking constantly until you get a smooth batter (it'll be quite thick.

Heat a large non-stick frying pan to medium heat.

Add a little oil and pour approximately 1/4 cup of the batter into the pan for each pancake . Spread out a little with the back of a spoon.

When the batter starts to bubble around the edge and on top, flip the pancake over and bake until the other side is also golden.

Contininue until you have used up all the batter. My pan fits only about three pancakes at a time and I have to make them in batches, keeping them warm in a warm oven.

These are maybe a little thicker than the 'standard' (whatever that may be) American pancake, but they are light and fluffy and taste great.

Enjoy!

Photobucket

The drinking the night before obviously also affected me. I nearly forgot to take a picture of the 'assembled' pancake and the one I did take of my half-eaten one, is rather blurry, but I guess that was my view of the world at the time!


Thank yous

Pin It Now!

Firstly a big THANK YOU to Nic at Cherrapeno who awarded me the E for 'Excellence' Award a while ago. Sorry Nic, that it took me so long to mention it here.


I've already passed this award on once and it really doesn't get any easier choosing the second time round as there are so many deserving blogs out there, but here I go anyways (in no particular order)...

Just Get Floury. Ginny shares great recipes, photos and stories and I love the idea of the Dollar Dish Duel, even if this time round I missed the deadline.

Tinned Tomatoes. Holler inspires me to cook more vegetarian dishes with her great recipes.

Kalofagas - Greek Food & Beyond. Nobody has ever made me want to get the BBQ out while it's still freezing and snowing like Peter with his great food and stories.

Another big THANK YOU goes to Rosie at Rosie Bakes a 'Peace' of Cake, for choosing my blog for the Arte y Pico Award. Rosie, I'm made up, even though of course now I'm in the impossible situation of having to choose five blogs to pass it on to.


A Slice of Cherry Pie
. Julia doesn't just share great recipes and wonderful pictures, she also set up the UK Food Blogger's Association and continues to manage it.

The Great Big Vegetable Challenge
. I love the idea and think everyone should make vegetables fun like this for their kids, so they can learn to love the rich variety there is on offer. Go check out Freddie's adventures.

Closet Cooking. Kevin is amazingly adventurous with his cooking. I don't know anybody else who makes their own kimchi. He even 'learns' Chinese symbols, so he can get the right ingredients when shopping in Chinatown.

Hannah's Country Kitchen. I first saw Hannah as a contestant on Masterchef last year and then found her blog. She bakes and decorates amazing cakes and I love her way of experimenting with unusual flavour combinations.

A Year from Oak Cottage
. I have 'known' Marie for quite a while now and hers was one of the first blogs I followed regularly and she was certainly partly responsible for getting me into the whole blogging thing.

The rules for the Arte y Pico Award are:

1. You pick five blogs that you consider deserve this award for their creativity, design, interesting material, and also contribute to the blogging community, no matter what language.
2. Each award has to have the name of the author and also a link to his or her blog to be visited by everyone.
3. Each award winner has to show the award and put the name and the link to the blog that has given her or him the award itself.
4. Award-winner and the one who has given the prize have to show the link of
Arte y Pico blog, so everyone will know the origin of this award.

Sunday 11 May 2008

Mozzarella, Tomato and Basil - A Taste of Summer

Pin It Now!

There are a few things that really taste of summer to me and fresh buffalo mozzarella, tomatoes and basil salad is one of those. Usually I just tear up a large ball of fresh mozzarella, slice vine ripened tomatoes and arrange it all on a plate, topped with the basil.

Last night though, we had some friends round for a BBQ at ours and I was looking for something quick to make and that people could easily start nibbling on while waiting for their stuff off the grill (it had to be quick as it was a rather spontaneous decision to have a BBQ, as I only made up my mind to have one at five in the afternoon).

So I decided to make 'mini salad portions on a stick' that were easily made, even easier to eat and tasted just as much of summer. They are great for bringing to parties, I promise they'll disappear quickly.

Photobucket

Mozzarella, Tomato and Basil Appertisers

mini Mozzarella balls
vine ripened cherry tomatoes
fresh basil leaves
freshly ground black pepper
balsamic vinegar syrup
extra virgin olive oil (optional)

Thread one mini Mozzarella ball, one basil leaf and one cherry tomato (cut them in half if they're on the big side) onto a cocktail stick.

Repeat until you have used all of them up.

Arrange on a plate and grind some black pepper over the lot.

Drizzle with balsamic vinegar syrup and extra virgin olive oil (most of the time I don't use any oil).

Enjoy!

Photobucket


Friday 9 May 2008

Roast Vegetable and Gruyere Quiche

Pin It Now!

When reading through Tinned Tomatoes by Holler this afternoon, she had posted an entry for the Vegetarian Feast blog event, hosted by Judith at Shortcut to Mushrooms. The event was just about perfect for me, as this time the challenge is to make a vegetarian quiche, tart, flan or savoury pastry (basically anything as long as it is vegetarian, flat and has a crust) and I had just come back from the kitchen where I had put my vegetables in the oven to roast for my quiche.

If I remember this right the recipe for this quiche came from a supermarket magazine and even though roasting the vegetables first means a little more effort and time, it is well worth it as they become wonderfully sweet and full of flavour. It also makes it the perfect recipe for using up left-over roast veg if you have any. The gruyere means it's nice and cheesy and not too eggy.

I love it when it's warm as a light meal with a side salad and even better it's great cold too, so ideal for picnics and lunch boxes. Of course you can make your own pastry, but if you don't have that much time or don't like making pastry the store bought stuff works just fine.

Photobucket

Roast Veg and Gruyere Quiche

350gr frozen shortcrust pastry, thawed
1 red onion, quatered
1 red pepper, de-seeded and chopped
1 yellow pepper, de-seeded and chopped
1 courgette, sliced thickly
1 tablespoon olive oil
2 large egg
125ml cream
120gr gruyere or mature cheddar cheese, grated

Preheat oven 200C/Gas6.

Roll out your pastry dough and line a deep 10 inch/25 cm flan dish.

Line with baking paper and baking beans and blind bake for 10 minutes.

Remove paper and beans and return to the oven to bake for another 5 minutes.

Place all the vegetables on a baking tray and drizzle with olive oil.

Place in the oven and roast for about 25-30 minutes until slightly charred.

Set aside and cool slightly, seperate the onion into separate layers.

Turn down the temperature of your oven to 180C/Gas4.

Whisk the eggs with the milk, stir in the cheese and season with salt and pepper to taste (you can also mix in a few of your favourite herbs).

Spread the vegetables over the bottom of the pastry case and pour the egg mixture over

Bake for approx 30-35 minutes.

Enjoy hot or cold.

Photobucket

Thursday 8 May 2008

Greek Courgette and Rice Bake

Pin It Now!

You know when you come across a recipe that you're not completely convinced about, but you try it anyways and are actually really positively surprised by the result? Well, that happened to me last night.

I had taken some lean minced beef from the freezer in the morning and then remembered that I had two courgettes that had been sitting in my fridge for over a week and were quickly approaching their beyond hope date. I had bought them to make a pasta sauce that a Portuguese friend of mine once made, involving plenty of garlic, cream and cheese, but since I am trying to get back into running and cooking a little healthier it never got made.

Anyways, what to do with those two ingredients and without having to go shopping? I just googled for recipes using both ingredients and came across this Greek Courgette and Rice Bake on a German cooking site called Marion's Kochbuch. Bingo! I have no idea if it is authentic, and as I said I wasn't completely convinced by just looking at the recipe, but I had everything in and got a chance to use my courgettes and minced beef and with small additions and alterations such as garlic (I just couldn't help myself), it turned into a simple and quick weeknight meal full of flavour, that I will definitely make again.

Photobucket

Greek Courgette and Rice Bake (serves 3-4)

125gr rice
1tbsp olive oil
1 onion, chopped finely
250gr lean minced beef
200gr tomatoes, peeled and quartered
300gr courgette, sliced medium thick
1 large clove of garlic, minced
1tbsp oregano
1tbsp thyme
salt, to taste
freshly ground black pepper, to taste
200gr feta cheese

Cook the rice according to the instruction on the packet, but use vegetable stock instead of water for extra flavour.

Heat the oil in a frying pan and add the onions and minced beef. Fry until the beef is browned, about 10-14 Minutes.

Preheat your oven to 200C/Gas 6.

Add the tomatoes, courgettes, garlic and herbs and cook on a moderate heat for another seven minutes or so. Season with salt and pepper.

Add the rice and stir until everything is well combined. If the mix is very dry you can add a couple of tablespoons of water.

Place into an oven proof dish and crumble the feta cheese over the top.

Bake for 10 minutes in the middle of the oven.

Enjoy.


Tuesday 6 May 2008

I'm back

Pin It Now!

I got back from Germany early on Monday morning and have just about recovered from far too little sleep over the past week or so.

The earlier trip to Glasgow was lovely, but apart from discovering that Mother's Pride Pan Bread is great for toasting and being bought a thistle shaped wooden porridge spurtle, I don't really have any foodie things to share.

The trip home to Germany was a bit more relevant when it comes to food blogging, I guess. I came back with two great cake recipes, that I'll share over the next couple of weeks or so and I bought some nice goodies, such as Strawberry vinegar (which is supposed to be great mixed with Cava) and a lovely Potatas Bravas dip mix from new delicatessen shop in my hometown. I would have probably bought loads more stuff, but I had only taken my small weekend trolley instead of the usual suitcase.

My sister is coming over in the car in a couple of months though, so I have already started to to write a list of things for her to bring over. I also had the first BBQ of the season at my friends house, to which I brought an old favourite of mine, Colourful Orzo Salad.

Photobucket

I got this recipe from the web originally, but have changed some of the ingredients and added things to my liking. The original called for parsley instead of fresh coriander for example, but I don't really like it all that much. I also started adding feta cheese after the first few times of making it and now never make it without. The salad looks pretty and there usually isn't any left.

Colourful Orzo Salad (serves 4-6)

1 1/2 cups orzo pasta
4 tbsp olive oil
3 tablespoons lemon juice
1/2 teaspoon lemon zest
salt, to taste
black pepper, to taste
2 garlic cloves, crushed
1 carrot, diced finely
1 1/2 cups bell pepper (red, green and yellow)
1 small red onion, diced
1/4 cup fresh coriander, finely chopped
1 small block of feta cheese, cubed

Cook the orzo according to the instructions on the packet in plenty of salt water.

In a large bowl whisk together the olive oil, lemon juice and zest, salt, pepper and garlic.

Add the carrot, peppers, onion and cooked orzo (there is no need to cool it first, and if you like you can serve the salad warm).

Stir well, making sure everything gets coated with the oil/lemon mix.

Add the fresh coriander and feta cheese and carefully mix into the salad, so that the feta doesn't break up too much.

Photobucket